No products in the cart.


How to draw skinny jeans
If you’ve wondered how to draw skinny jeans and not knowing it has stopped you from creating great f...
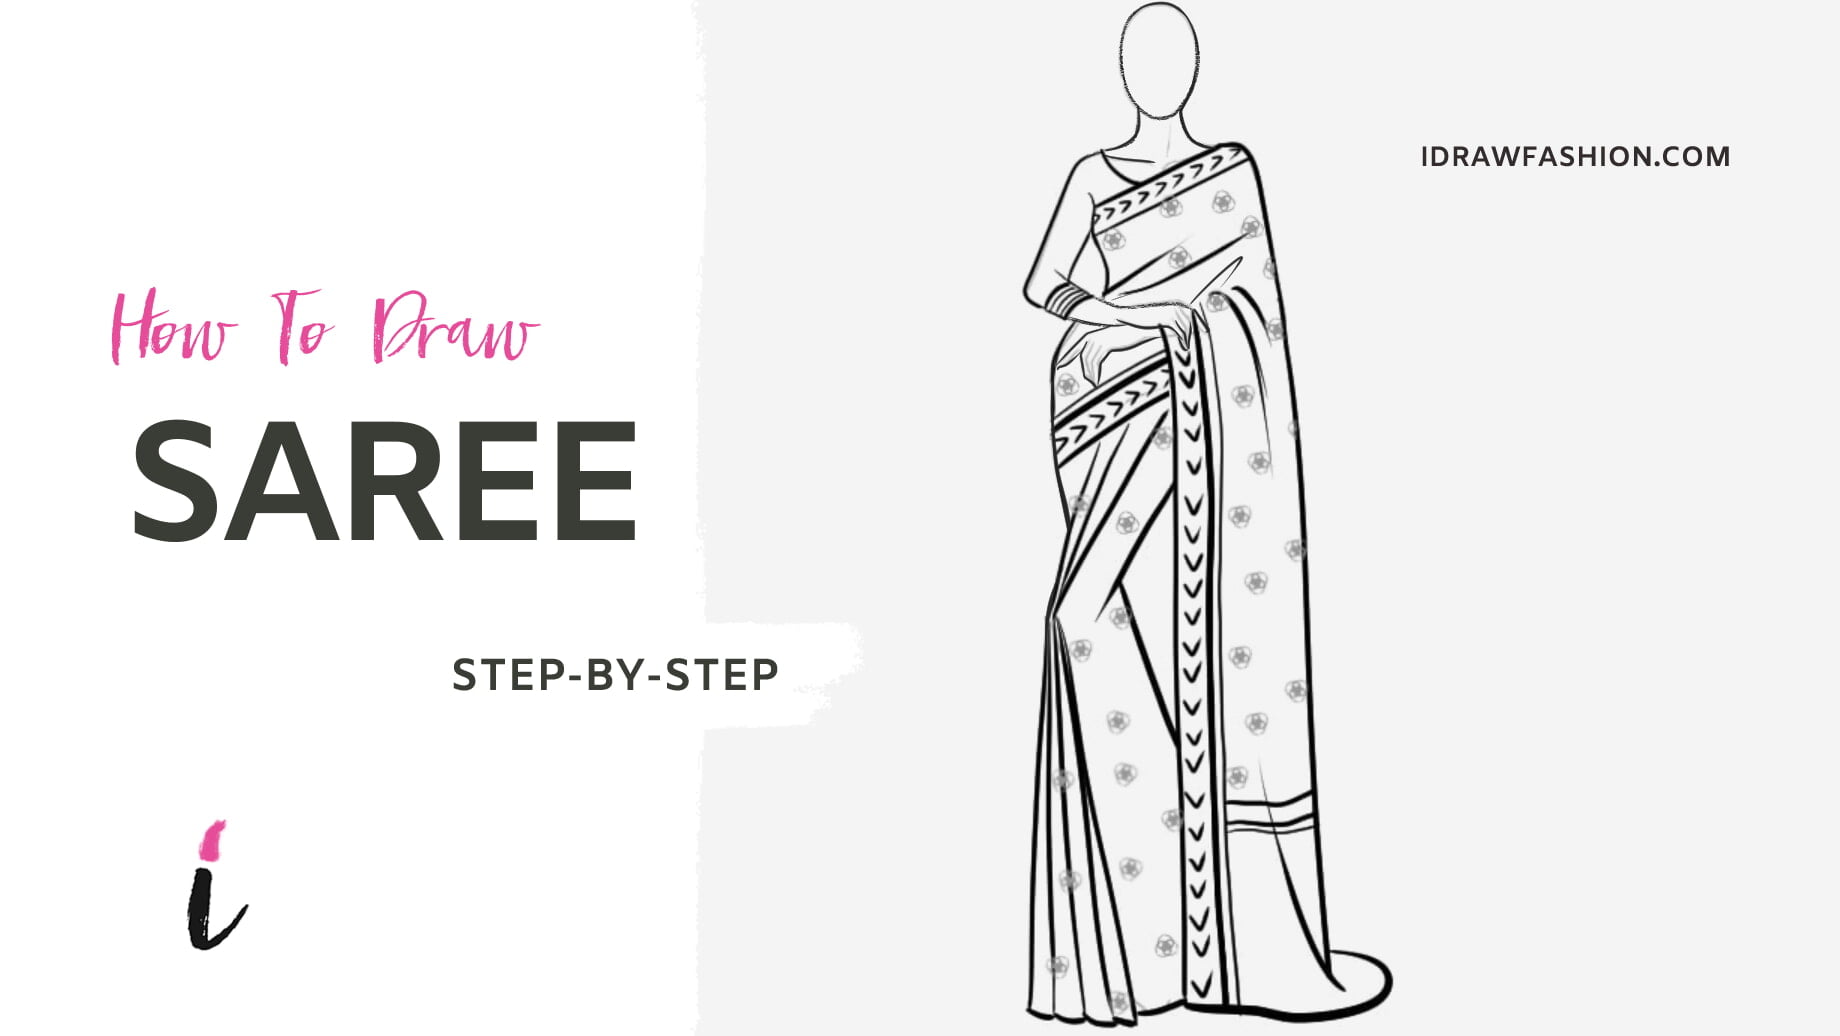
In this tutorial you will learn how to draw a saree step by step. The saree ( also called sari) is a popular festival wear in India. It is a large piece of cloth that Indian women drape in beautiful ways around their bodies. There are many different ways to drape a saree. Here I will show you how to draw the nivi style of draping which is one of the most popular trends nowadays among Indian women. This tutorial will show you how to draw Indian saree in a basic shape and style. Once you master the steps, you can try to combine different shapes, colors, and patterns to create your own unique designs.
If you feel ready to start, grab your pencils and let’s jump right in this Indian saree tutorial.
The choice of a suiting model pose is very important if you want your saree design sketch to look its best. For best results choose a figure template with her feet close together. Draw the arms either resting on the waist or in front of the body and bent at the elbows.
In this tutorial I used figure template #206 . Feel free to download it if you want to follow the steps exactly as shown here. Of course, you can always sketch your own croqui. You will find many tutorials on how to draw fashion figures here.
After you have a model pose suitable for a saree dress, go ahead and draw two diagonal lines. The first starts at the armhole and goes up to the opposite shoulder. The second line crosses the hips of the model.

Draw a second line parallel to each of the diagonal lines. Design the saree board with shapes of your choice. You can create any pattern or decoration here. Make the two bords identical, similar or completely different from each other.

The part of the sari that hangs from the shoulder down is called pallu. Pull a line from the wrist down to the ground and erase the part of the board that gets overlapped. Draw another line from the shoulder down following closely the arm outline.

To make the saree drawing more realistic we need to sketch the end of pallu end look like it touches the ground. This means to draw the hemline curved, not straight. Notice the diagonal fold that crosses the outer line of the cloth for additional 3-dimentionality.

This board is the same as the one that crosses the hips of the model, but with the direction of the pattern elements is changed (now they go down). Make sure you keep the width of the board consistent throughout the whole length of the pallu.

The board that finishes the pallu can be the same size as the others, but more often it is much wider and has a different pattern. Usually, this bottom board reaches the calves of the figure.

This type of saree features pleats at the center front. There are usually between 4 to 8 pleats depending on the design. The more pleats, the smaller they are.
To center the pleats for this pose, pull two triangular guidelines that connect at the knee. The first triangle follows the tight and ends right at the knee. The second triangular guideline starts at the knee and hits the ground. Don’t make the second triangle too wide at the base.

Add broad pleats following the guidelines you just made in the previous step. Notice how they overlap at the bottom.

The skirt of the saree has a fishtail shape. Draw it form -itting until the knee and then let it become wide and full. It is important to keep the skirt underneath the pallu.

Next, draw the saree blouse. It can be short, medium or long-sleeved. Notice that the end of the sleeve is slightly curved to create the illusion it hugs the arm. Avoid straight lines in your fashion sketches, especially when the garments are close-fitting.

To add even more 3-Dimentionality to the fashion sketch, draw folds that start at the waist and head toward the opposite shoulder and arm. Make sure you vary your lines and they are not the same length. This could look unrealistic and stiff.
Add a couple more folds curving around the forearm to hint the arm shape.

Erase the croqui lines that are covered by the cloth. Now it’s time to be creative and design your own pattern for the saree. You can go with abstract shapes, realistic flowers or any geometric shapes. For tips on how to place the patterns in your fashion sketches check my “How to Draw Floral Print” tutorial.
Cover the whole drape except for the large bottom board. You can leave it blank or create a different pattern for it.

Color your saree fashion sketch in colors that you like. I recommend you to use a contrast color for the boards. Notice that the large bottom bord is different in color and texture from the rest of the design. Chose a color for the blouse that goes well with the saree.

I hope this step-by-step tutorial was easy to follow and inspired you to create new collections and draw saree in all shapes and colors. If you want to learn how to draw Indian girl faces check out my online course “HOW TO DRAW FACES” – it shows step-by-step videos and guides that will help you draw models of any ethnicity.
Happy drawing!


22 comments
Chicken Road
Thank you for this detailed tutorial! I always struggled with the draping part of a saree, but your step-by-step guide made it so much easier to understand. Can’t wait to try it out!
dg club login
This step-by-step guide is amazing! I always struggled with draping a saree, but your easy-to-follow instructions made it so much simpler. Can’t wait to try this out for my next event. Thank you for sharing!
51 Game Login
Loved the step-by-step guide! The illustrations are super helpful, and I can’t wait to try draping my saree using these tips. Thanks for making it so easy!
Jalwa Game login
This post is incredibly helpful! I always found draping a saree daunting, but your 12 easy steps make it look so simple. Can’t wait to try it out! Thanks for sharing!
A1 Lottery
I absolutely loved this tutorial! The step-by-step instructions made it so easy to follow, and the illustrations were super helpful. I can’t wait to try draping my saree using these tips. Thank you for sharing such a wonderful guide!
y89
This guide is super helpful! I’ve always struggled with draping a saree, but your step-by-step instructions make it look so easy. Can’t wait to try it out for my next event! Thank you for sharing!
tc lottery app
This tutorial is fantastic! The step-by-step approach makes it so easy to follow. I can’t wait to try draping a saree for my next event. Thanks for sharing these tips!
Tashan Win Login
This post makes draping a saree look so easy! Thank you for breaking it down into simple steps. I can’t wait to try it out for my next event!
DG Club Game
I absolutely loved this post! The step-by-step approach made it so easy to follow. I can’t wait to try draping a saree myself. Thank you for the clear illustrations and tips!
L7 LOTTERY LOGIN
This is such a helpful guide! I always found draping a saree challenging, but your step-by-step instructions make it so easy to follow. I can’t wait to try it out myself! Thank you for sharing these tips!
Fortnite Android
Loved this post! The step-by-step instructions made it so easy to follow. I can’t wait to try drawing a saree myself! Thank you for sharing such helpful tips!
poppy Chapter 3 ApK
Loved the simplicity of these steps! The illustrations make it so easy to follow along. Can’t wait to try draping a saree myself. Thanks for sharing!
biliwin login
This post is so helpful! I’ve always struggled with draping a saree, but your step-by-step guide makes it look so easy. Can’t wait to try it out for my next event! Thank you for sharing!
Teer Win
Such a clear and helpful guide! I love how you broke down the process into easy steps. Can’t wait to try draping a saree using your tips!
Jalwa Lottery
I absolutely loved this step-by-step guide! The illustrations made it so easy to follow along. I can’t wait to try draping a saree on my own. Thanks for sharing such a useful post!
Dg Club Login
This tutorial is super helpful! I’ve always struggled with draping a saree, but these steps are so clear and easy to follow. Can’t wait to give it a try! Thank you for sharing!
91 Club apk
This guide is fantastic! I love how you broke down the steps so clearly. I can’t wait to try draping a saree using your tips. Thank you for sharing!
magisk app
Wow, this guide is so helpful! I’ve always struggled with draping a saree, but your step-by-step instructions make it seem much easier. Can’t wait to try it out! Thank you for sharing!
Y2mate Official
Wow, this guide is super helpful! I love how you’ve broken it down into easy steps. I’m excited to try drawing a saree using your tips. Thank you for sharing such a clear and creative approach!
Na7 Whatsapp
Thank you so much for sharing this tutorial! I’ve always been fascinated by the beauty of Indian sarees and have wanted to learn how to draw them. Your steps are very clear and easy to follow, and I can’t wait to give it a try. :D
Anonymous
I’m 9 years old and it really helped me a lot. I needed to use it for my paragraph and the topic was my favorite outfit. I love sarees a lot. I’m not kidding.
VIVIAN
THANKS A LOT